
Table of contents
- Table of contents1
- Introduction3
- Ideal seated workstation posture – sitting3
- The 90-90-90 rule3
- In detail:4
- Before you sit down, make sure there is adequate clearance under the desk4
- Height adjustment4
- Breathable mesh4
- The back should be fully supported4
- Seat depth (front to back)5
- Tilt and tension5
- Tilt-limiter5
- The lumbar support5
- A PostureFit6
- Armrests6
- Why this posture works:6
- Worktop access7
- Workstation8
- Carpal tunnel syndrome:8
- Height adjustable desks9
- Ergonomic benefits9
- Health advantages9
- Increased productivity and focus9
- Promotes an active lifestyle10
- Versatility and inclusivity10
- Reduced absenteeism and enhanced wellbeing10
- Height adjustment setup10
- Monitors and laptops11
- Positioning:11
- Multiple monitors:12
- Laptop set-up13
- Keyboard and mouse position14
- Keyboard placement14
- Mouse placement14
- Wrist position14
- Ergonomic home office14
- Start by choosing a desk15
- Executive desk15
- Table desk15
- Electric standing desk15
- Next, choose an ergonomic office chair15
- Finally, set up your equipment properly16
- Final tips: dos and don’ts16
- Final ergonomic checklist16
- Summary17
- Sources:18
Introduction
Ergonomics is looking for ways to improve the fit between work and worker to support health, well-being and productivity. This means fitting the environment to the worker and not the other way around — for example, designing workstations with the flexibility to support a variety of heights, working postures and preferences.
Performing a quick body scan at least every hour to consider how you are feeling can help bring attention to potential problem areas so you can make adjustments before it’s too late. Ergonomics isn’t just about equipment and workstation setup—it’s also about our work habits and practices.
Ideal seated workstation posture – sitting
The best seated posture is a neutral, supported position: feet flat on the floor, hips slightly above knees, lower back supported, elbows near 90–110 degrees, and the monitor’s top at eye level—combined with changing positions every 30–45 minutes.
A chair should move the way the body moves. In the best of all possible worlds, the body is free to position itself spontaneously, constrained only by gravity. A person seated at work should be able to move freely and unselfconsciously from computer-related tasks to more relaxed or interactive postures. The work chair should follow along, providing optimal support whether the body is in motion or at rest.
The 90-90-90 rule
The 90-90-90 rule is the foundation of proper sitting posture. This simple principle ensures your body is positioned with minimal strain:
- 90 degrees at ankles: feet flat on the floor (or footrest) with ankles at 90 degrees.
- 90 degrees at the knees: knees form a 90-degree angle, positioned slightly lower than the hips.
- 90 degrees at the elbows: elbows at 90 degrees when typing, upper arms hanging naturally at the sides.
In detail:
Before you sit down, make sure there is adequate clearance under the desk for your thighs, knees and feet.
- Height adjustment: start with your chair in the highest position and lower the chair until your feet are flat on the floor, or on a footrest; ankles at about 90 degrees. This is crucial for maintaining an optimal posture. It is essential for supporting the natural alignment of the spine and preventing unnecessary strain on the lower back. Sitting too high reduces the blood flow in your thighs. Sitting too low reduces the blood flow in your knees. Your knees should be at about 90 degrees, level with or slightly below the hips. Your hips should be slightly higher than your knees to reduce lumbar disc pressure. Don’t cross your legs. This creates hip and pelvic imbalances. Elbows at 90–110 degrees, forearms parallel to the floor. Wrists straight while typing; avoid bending upward or sideways. Monitor directly in front, top of screen at or slightly below eye level, about an arm’s length away.
- Breathable mesh: the breathable mesh keeps the user cool and comfortable, especially during long work hours. By allowing air to flow, the breathable mesh helps to prevent overheating and sweating, which can be common in chairs with an upholstered seat / back. It reduces pressure points and ensures long-lasting comfort.
- The back should be fully supported: by the chair; avoid perching on the front edge, which eliminates lumbar support and causes lower back strain. Sitting against the back of your chair, with the backrest against the seat pocket, is recommended for optimal lumbar support. This position helps to maintain the natural curve of the spine, which is essential for spinal health. By sitting this way, the lower back is supported in the small of the back (the narrow region of the lower back, located just above the buttocks, around L4-L5 or L5-S1 vertebrae), not pushed forward aggressively, which can help prevent stiffness and lower back pain. Shoulders relaxed, not lifted or pulled back rigidly. Remove all items from your back pockets as this may obstruct your blood flow.
- Seat depth (front to back): sit all the way in the back of the chair. There should be 2-4 finger widths of space between the front edge of the seat and the back of your knees. Too much space and you won’t have lumbar support, too little space cuts off circulation to your leg.
- Tilt and tension: Adjust the tilt mechanism to allow comfortable reclining without feeling unstable. Use the tension knob to increase or decrease resistance when leaning back. This ensures the chair supports dynamic movement and reduces pressure on the spine.
- Tilt-limiter: the adjustable tilt allows you to set the recline range to different postures (upright, full recline and intermediate positions), ensuring a comfortable sitting position. The tilt-limiter helps maintain the ideal seat angle, preventing excessive tilting, which is crucial for spinal alignment and overall comfort. It is advised to recline when not working on the computer (while on the phone or talking to a colleague for example). This opens up your body and increases blood and air flow.
- Forward seat angle: designed to promote a more active sitting posture, which can be particularly beneficial for tasks that require a forward leaning position, such as typing or writing. This adjustment encourages a more upright posture and reduces pressure on the lower back, contributing to better overall sitting comfort and support.
- Kinetic seating: as the chair reclines, the feet should remain flat on the floor as the lower leg pivots around a stationary ankle joint (A). The knee joint (B) doesn’t pivot so much as travel in a gentle arc. The backrest drops about the hip pivot point (C), maintaining the same point of contact between the backrest and the pelvis throughout the range of movement. The arms pivot about the shoulder joint (D). The armrests move with the backrest to support the arms as they drop back in their natural rotation around the shoulder joint. Throughout the movement the head pivots about the cervical spine (E) to maintain a constant relationship between the face and a visual target.
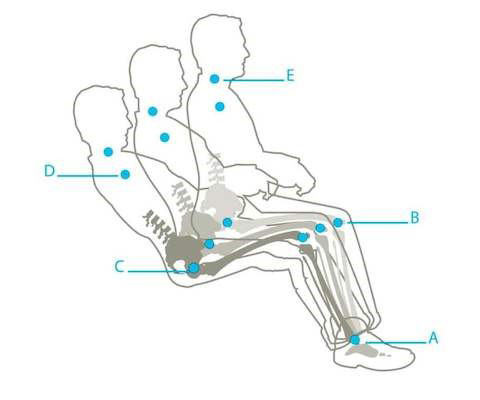
Figure 1: Kinetic seating.
- The lumbar support: is placed at the natural inward curve just above the belt line. It provides support only to the spine. Adjustments allow the user to raise the lumbar support to match the natural curve of the lower back.
- A Posture Fit: A PostureFit is designed to support the natural alignment of the spine and provide lower back comfort. It provides support to both the spine and the sacrum. It supports the sacral region to nurture the natural S-shape of the spine and activate a healthful posture. Users can achieve a more ergonomic sitting position, reducing the risk of back pain and promoting better posture. This feature can be a fixed part of the backrest or can allow for both vertical and horizontal adjustments to customize the lumbar support to individual body types. This feature is particularly beneficial for users who may have different spinal curves or need more tailored support. When we stand up, our pelvis is slightly tilted forward to better connect with our spine. When seated we should keep this same tilt in our pelvis. This is attained by using a PostureFit. This tilt is between 4 and 7 degrees in males and 7 to10 degrees in females.
- Armrests: set the armrest height so your elbows are bent at 90 degrees and shoulders remain relaxed. Adjust the width or angle of the armrests to support your forearms comfortably while typing or using a mouse. Proper armrest positioning prevents shoulder and neck strain. Avoid lateral leaning (leaning on one armrest), it shifts your spinal alignment and creates uneven muscle loading.
Why this posture works:
it maintains natural spine curves, reducing disc pressure and muscle strain. It prevents forward head posture, a major cause of neck pain. It supports relaxed shoulders and neutral arm position, reducing wrist and forearm strain.
Still, no single posture is ideal if held too long. Sitting still perfectly is worse than sitting badly with movement. Your body needs movement to maintain circulation, prevent stiffness, and keep muscles engaged. You should change your position every 30-45 minutes and take short min-breaks (1-2 minutes) frequently. Standing, stretching or even fidgeting reduces cumulative strain.
The most common mistake is adjusting one thing in isolation. Your chair height affects your keyboard height, which affects whether you need a footrest, which affects your thigh angle. Work through the setup in order: chair height first so your feet are flat, then keyboard and mouse at elbow height, then monitor distance and height, then lumbar support and armrests. If one adjustment throws off another, a footrest or keyboard tray, or a height adjustable desk usually resolves the conflict.
Avoid phone cradling. Holding a phone between your ear and shoulder produces extreme lateral cervical flexion. Use a headset or speakerphone. This single change can eliminate a significant source of cervicogenic headaches (originating in the neck).
Worktop access
Everything you frequently need should be within arm’s length.
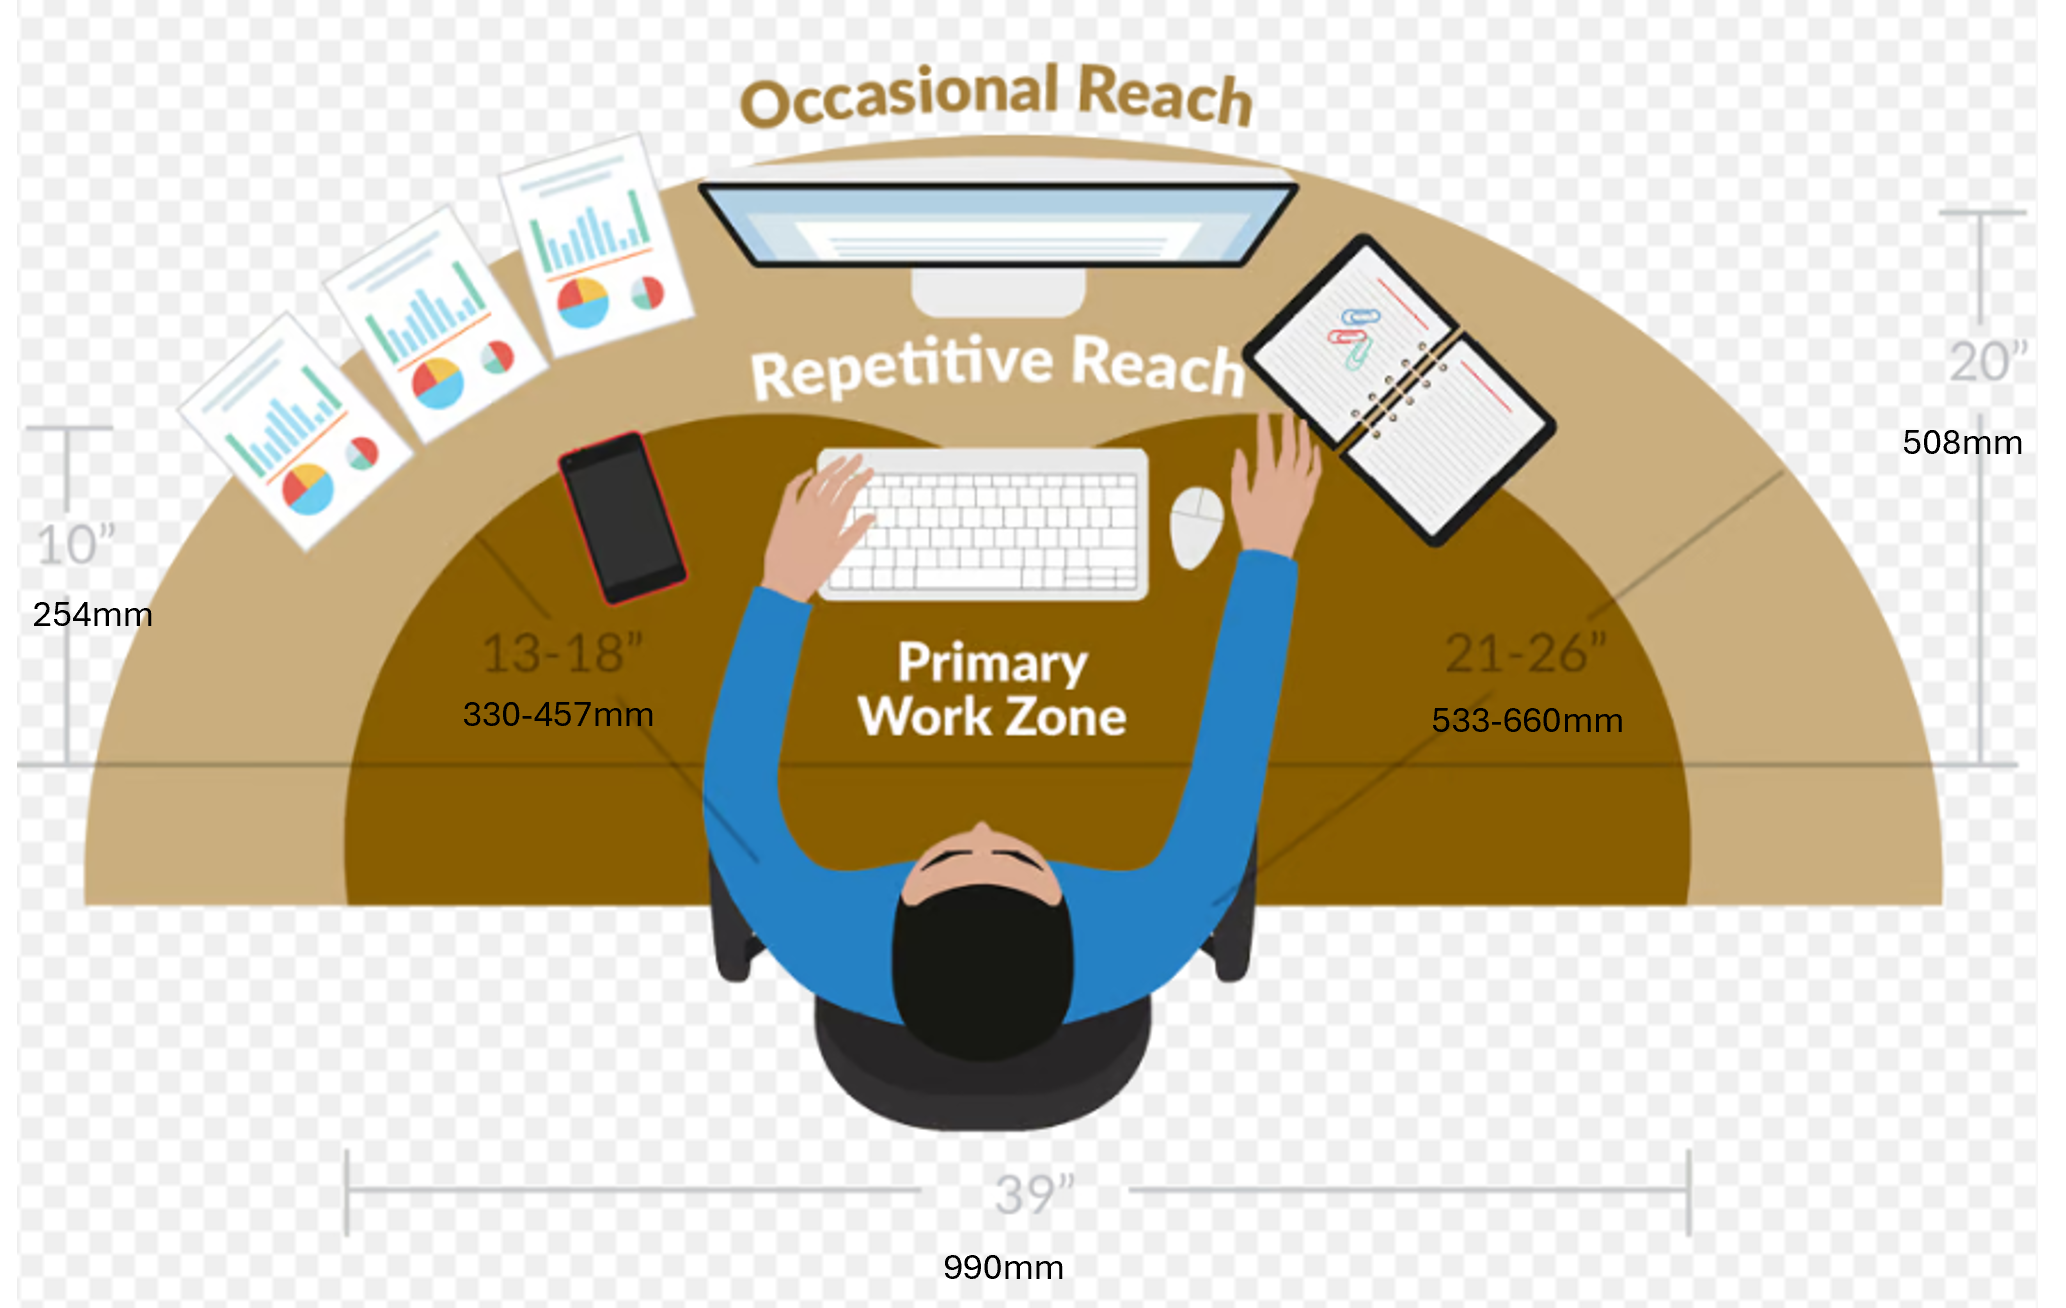
Figure 2: Worktop access.
Workstation
Your desk (if height adjustable) should be set at a height that allows you to have your feet flat on the floor while maintaining a 90 degree angle at your knees, with your elbows at 90 degrees when typing, upper arms hanging naturally at the sides and allowing you to have a straight line between your elbow and your fingertips while using your keyboard or mouse. Lessen stress on the hands and wrists to help prevent carpal tunnel syndrome (see link). While using a keyboard, do not bend the wrists all the way up or down.
Carpal tunnel syndrome:
Carpal tunnel syndrome is one of the most common hand conditions. It is caused by pressure on the median nerve in the carpal tunnel. The carpal tunnel is a narrow passageway in the wrist. It is on the palm side of the hand.
When the median nerve becomes compressed in the carpal tunnel, symptoms can include numbness, tingling and weakness in the fingers and hand. Wrist structure, health conditions and repeated hand motions may play a part in carpal tunnel syndrome. Anything that squeezes or irritates the median nerve in the carpal tunnel space may lead to carpal tunnel syndrome. Proper treatment often lessens the tingling and numbness and restores hand function.
Height adjustable desks
Height adjustable desks improve health, ergonomics, productivity and workplace inclusivity by allowing users to alternate between sitting and standing. Investing in a height adjustable desk provides ergonomic support, health benefits, productivity gains and inclusivity, making it a valuable addition to modern offices and home workspaces. By enabling users to alternate between sitting and standing, these desks foster a dynamic, healthier and more efficient work environment.
Ergonomic benefits
Height adjustable desks not only give you a choice between sitting and standing up while at your desk, but they also allow users to customize desk height to their body dimensions, reducing strain on the neck, shoulders, wrists and lower back. This flexibility helps prevent musculoskeletal disorders and promotes proper posture throughout the day, especially for those who spend long hours at a computer.
Health advantages
Prolonged sitting is linked to obesity, cardiovascular disease, type 2 diabetes and other health issues. Sit-stand desks encourage movement and standing intervals, improving circulation, reducing sedentary behavior and alleviating upper back, shoulder and neck discomfort.
Increased productivity and focus
Alternating between sitting and standing can boost alertness, energy and cognitive function. Research indicates that brain activity can increase by up to 20% when standing, leading to faster decision-making and improved task performance.
Promotes an active lifestyle
Height adjustable desks encourage frequent moving, which can improve posture, increase calorie burn and enhance mental clarity. Over time, these small changes contribute to a healthier, more active lifestyle and reduce the risk of chronic conditions associated with sedentary work.
Versatility and inclusivity
These desks accommodate a wide range of users, including those who are tall, short, or use wheelchairs, making them ideal for shared inclusive workspaces. This adaptability supports diverse workforces and ensures comfort for all employees.
Reduced absenteeism and enhanced wellbeing
By alleviating physical discomfort and promoting better health, height adjustable desks can reduce absenteeism due to back pain, fatigue or other work-related ailments. Users also report feeling more energetic and less stressed, contributing to overall workplace wellbeing.
Height adjustment
Proper setup ensures elbows are at a 90-degree angle while typing and the top of the monitor is at eye level. The more movement and change in postures you do, the better you feel. While standing, alternate resting each foot on a footstool to relieve tension in the spine and increase circulation.
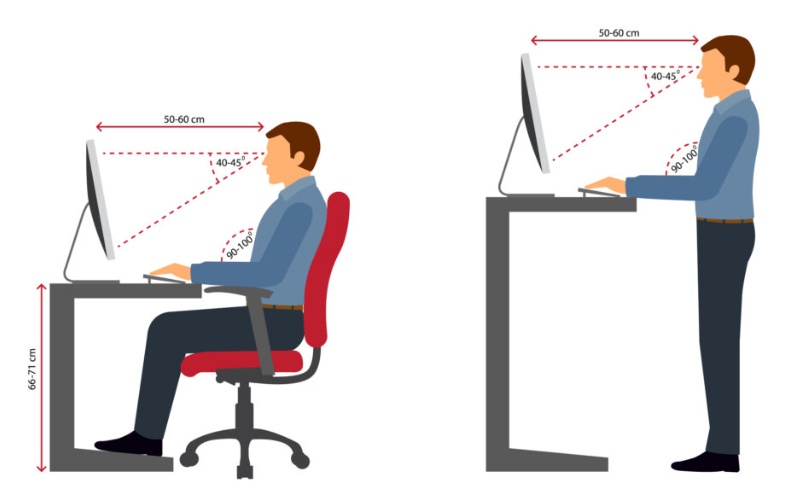
Figure 3: Height adjustment.
Monitors and laptops
Adjustable monitor arms improve ergonomics, free up desk space, reduce eye and neck strain, and enhance productivity. They allow users to position their screens at the optimal height, angle and distance, promoting a neutral posture that reduces neck, shoulder and back strain.
By lifting monitors off the desk, monitor arms free up valuable surface space, creating a cleaner and more organized workspace. This is especially beneficial for smaller desks or dual-monitor setups, allowing for easier placement of keyboards, laptops and other office tools.
Adjustable monitor arms help position screens to minimize glare from lights or windows and maintain a comfortable viewing angle. This reduces eye fatigue and enhances focus during long work sessions.
Monitor arms provide extensive adjustment options, including tilt, swivel, rotation and height changes. This flexibility allows users to share screens, rotate monitors to vertical mode, or adjust for different tasks, improving workflow and collaboration. Dual or triple monitor arms can optimize multi-screen setups.
Studies have shown that adjustable monitor arms can reduce musculoskeletal discomfort, with some reporting up to a 65% decrease in neck and shoulder strain. By supporting proper posture and reducing repetitive strain, monitor arms contribute to long-term health and comfort in the workplace.
Positioning:
Position the main monitor squarely in front of your body. Place your monitor at least an arm’s length away. The exact distance depends on the screen size, font size and your vision. A larger screen may need to be pushed slightly farther back, while someone wearing bifocals may need it closer or at a different angle. The key test: you should be able to read comfortably without leaning forward. The top line of the screen should be at or slightly below your natural eye level (when looking at the horizon). This lets you view the middle of the screen with a slight downward gaze, which is the most comfortable resting position for your eyes and keeps your neck from tilting up or jutting forward. If your monitor sits too low on the desk, a monitor arm or a simple riser solves the problem quickly.
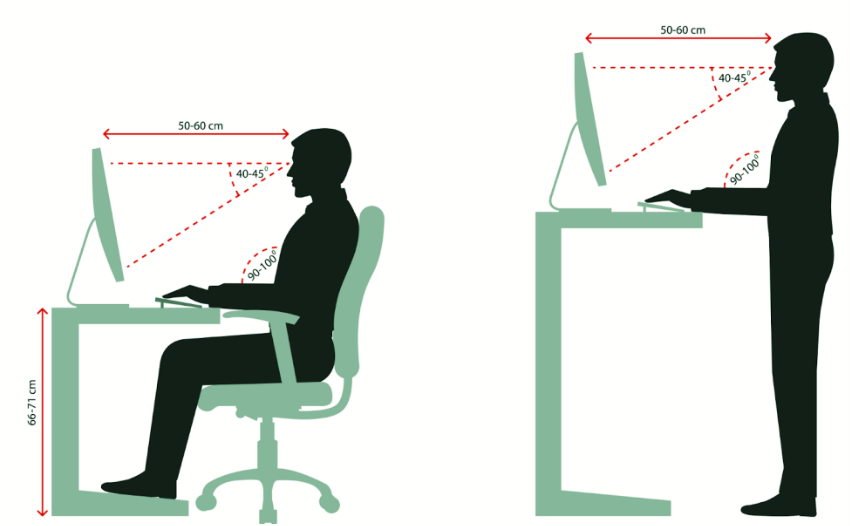
Figure 4: Positioning.
Multiple monitors:
If you use two (or more) screens, how you position them depends on how equally you use each one. When one monitor is your primary screen and the other is for reference, center the primary monitor directly in front of you with the keyboard aligned beneath it. Place the secondary monitor immediately to the side at about a 30-degree angle, with the center of your keyboard no more than 12” (305mm) from the center of the primary screen.
If you use both monitors equally, position them side by side with the seam between them centered on your body, and align the keyboard with that center point. In either case, push the monitors as close together as possible, using thin-bezel flat panels only if you can. The goal is to rely on eye movements rather than head and neck rotation to shift between screens.
Assume the right ergonomic posture, then designate your main monitor, orient your mouse to the main screen. This keeps your mouse out of the “far reach” zone, the zone that can cause repetitive stress injuries because your elbow angle approaches 180 degrees.) Then adjust the other monitor(s) so they are at parallel height and with the top of the screen at eye level.
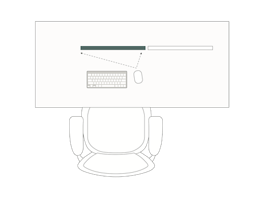
Figure 5: Multiple monitors.
Laptop set-up:
You cannot achieve proper monitor height (eye level) and proper keyboard position (elbows at 90 degrees) simultaneously with laptop alone. This forces users into text neck position or forward head posture. This is a condition caused by prolonged forward head positioning while using electronic devices. It can lead to neck pain, muscle tightness and other postural issues.
To prevent this, consider using a laptop stand, which raises the screen to eye level; an external keyboard, which allows a proper typing position; an external mouse completes a proper setup. An adjustable laptop stand allows you to customize the height and angle of your laptop, ensuring your body remains aligned and reducing strain during long work sessions.
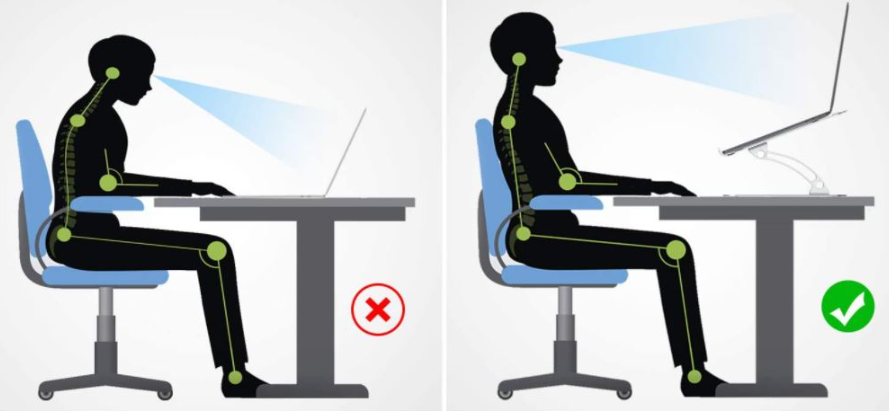
Figure 6: Laptop set-up.
Keyboard and mouse position
Keyboard placement
Put the keyboard in front of you, centered on your body – the “B” stands for bellybutton and should be in the center of your body. It should be close enough so that your elbows stay at 90 degrees. 100-150mm from the edge of the desk, with room for your wrists to rest during breaks. Your upper arms should hand naturally at the sides, not reaching forward.
Mouse placement
Put your mouse at the same level as your keyboard, close enough to the keyboard so don’t need to reach to the side. Consider switching the mouse side occasionally to balance muscle use.
Wrist position
Keep your wrists neutral (straight) while typing – not bent up, down or to the side. Wrist rests are for breaks, not active typing. During typing your wrists should float slightly above the keyboard (see also workstation – carpal tunnel syndrome).
Ergonomic home office
While many corporate offices are furnished with high-quality ergonomic designs, such as responsive desk chairs and height adjustable desks and / or monitor arms, home offices often lack ergonomics. A sedentary lifestyle can lead to adverse health effects – including carpal tunnel syndrome, tendonitis, and neck and back pain – which are all the more exacerbated by a workplace that lacks comfort and ergonomic furniture. If you find yourself facing muscle fatigue and soreness after a long day’s sit, an ergonomic home office can help mitigate your pain and discomfort. From choosing the right desk for your profession and working style to selecting an ergonomic office chair to arranging your equipment, here is how to create an ergonomic setup at home.
Start by choosing a desk
When it comes to finding the perfect ergonomic desk for your at-home workstation, the desk’s size, style and materials should all play a role in your decision. First, look for a desk that is suitable for the type of work you do.
Executive desk:
If you need ample surface space for printed documents and texts, select a spacious executive desk. These desks are often striking in appearance and can inspire the rest of your home office design.
Table desk:
If your office space doubles as a dining room, choose a table desk that can pivot from work to meals. Table desks tend to be minimalist in design so they can move most seamlessly through their different functions.
Electric standing desk:
An electric standing desk is an excellent option to keep you moving and changing your posture throughout your working day. Or if you work predominantly from a laptop, consider a compact design. Moving between sitting and standing throughout your workday promotes muscle movement and helps increase blood flow, thereby improving your comfort and ability to focus. Adjustable height desks come in a wide range of sizes, and many electric standing desks can easily be raised and lowered by the press of a button, so you can find the most ergonomic adjustment for your height. The best ergonomic desk is one that will help you achieve a healthy posture, with a desk height that provides adequate clearance for your thighs, knees and feet. When you sit at a desk or stand at an adjustable height desk, your arms and wrists should be parallel to the floor as you type, with your elbows bent at 90 degrees.
Next, choose an ergonomic office chair
See the section on “Ideal seated workstation posture – sitting”, where you can find the key features that can help mitigate the discomfort that can arise from extended periods of sitting.
Finally, set up your equipment properly
Proper spacing plays a key role. Your computer should be an arm’s length distance away. Your eyes should be aligned with the top of your screen. If you work from a laptop to elevate your screen, plus an external keyboard and mouse for typing. If you use a monitor, opt for a monitor arm to properly adjust the height of the screen.
Final tips: dos and don’ts
Office ergonomics is the combined effect of the right desk, an ergonomic office chair and proper equipment spacing.
- DO finetune your setup for your body. Keep your head and neck straight and shoulders relaxed. Your elbows should be bent at a 90 degree angle with your arm comfortably close to your body. Sit with your back in the seat pocket of the chair, positioned against the backrest for optimal lumbar support. Ensure your thighs are parallel to the floor, knees are bent at 90 degrees and that your feet are flat on the floor.
- DON’T forget proper lighting. Inadequate lighting can cause eye strain, which can lead to headaches or migraines. Ample natural light is best, but if your workspace doesn’t have windows, or if you work until after dark, choose a dimmable task lamp that lets you adjust the light as needed.
- DO get up every hour to stretch and move your body. Movement improves circulation and overall comfort, which can help improve your focus.
Final ergonomic checklist
Use this to verify your setup:
- Feet flat on the floor or on a footrest
- Knees at 90 degrees, slightly lower than hips
- Sitting all the way back in your chair
- Lumbar support fits the curve of your lower back
- Shoulders relaxed, not elevated
- Elbos at 90 degrees when typing
- Wrists neutral / straight, not bent
- Monitor top at or slightly below eye level
- Monitor at arm’s length away (500-700mm)
- Keyboard directly in front, close to the body – center your body to the “B” of your keyboard
- Mouse and keyboard at the same level
- No screen glare from windows or lights.
Summary
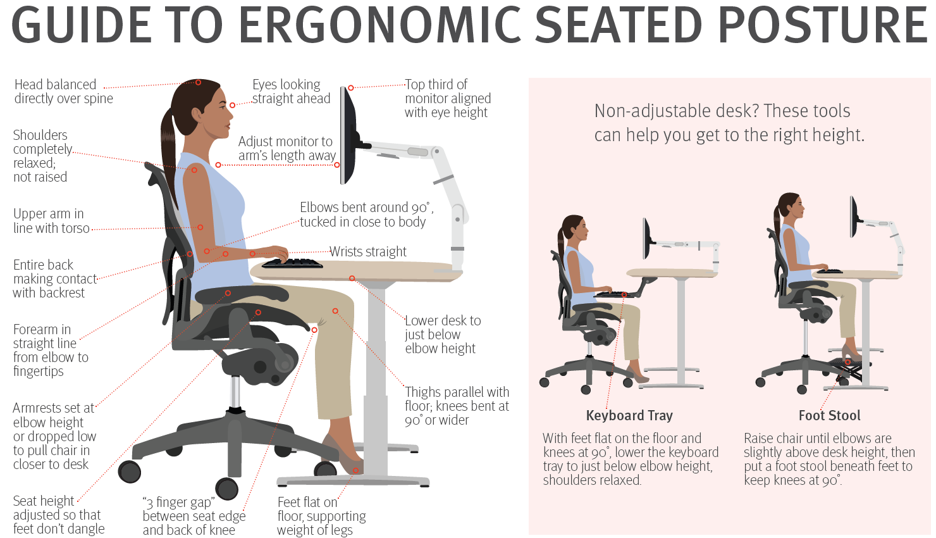
Figure 7: Guide to Ergonomic Seated Posture.
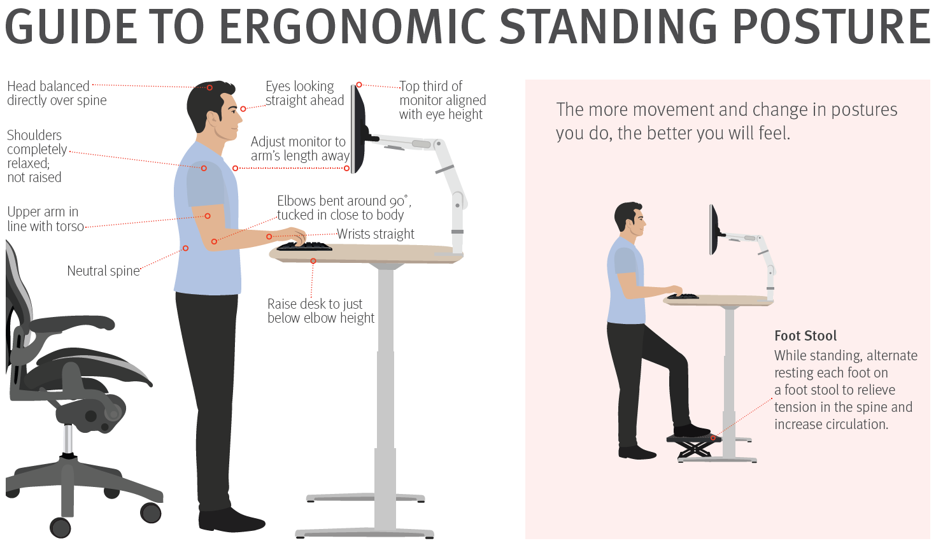
Figure 8: Guide to Ergonomic Standing Posture.